Wednesday, February 2, 2011

A Simple Way of Organizing Photo Negatives & Printed Pictures & My Goal for 2011...

Almost  6 years ago, I moved 3000 miles across the country.
It was a big move.
One of the things that I wanted to make sure made the move safely were my precious picture negatives of my babies growing up.
I made the decision to hand carry my negatives myself in my carry-on baggage.
This way I knew that they would make the journey safely...with no danger of being lost or damaged by the moving company.
So I organized my negatives into a binder using protective negative sleeves.
 I moved all my negatives into the negative sleeves, and arranged them chronologically.
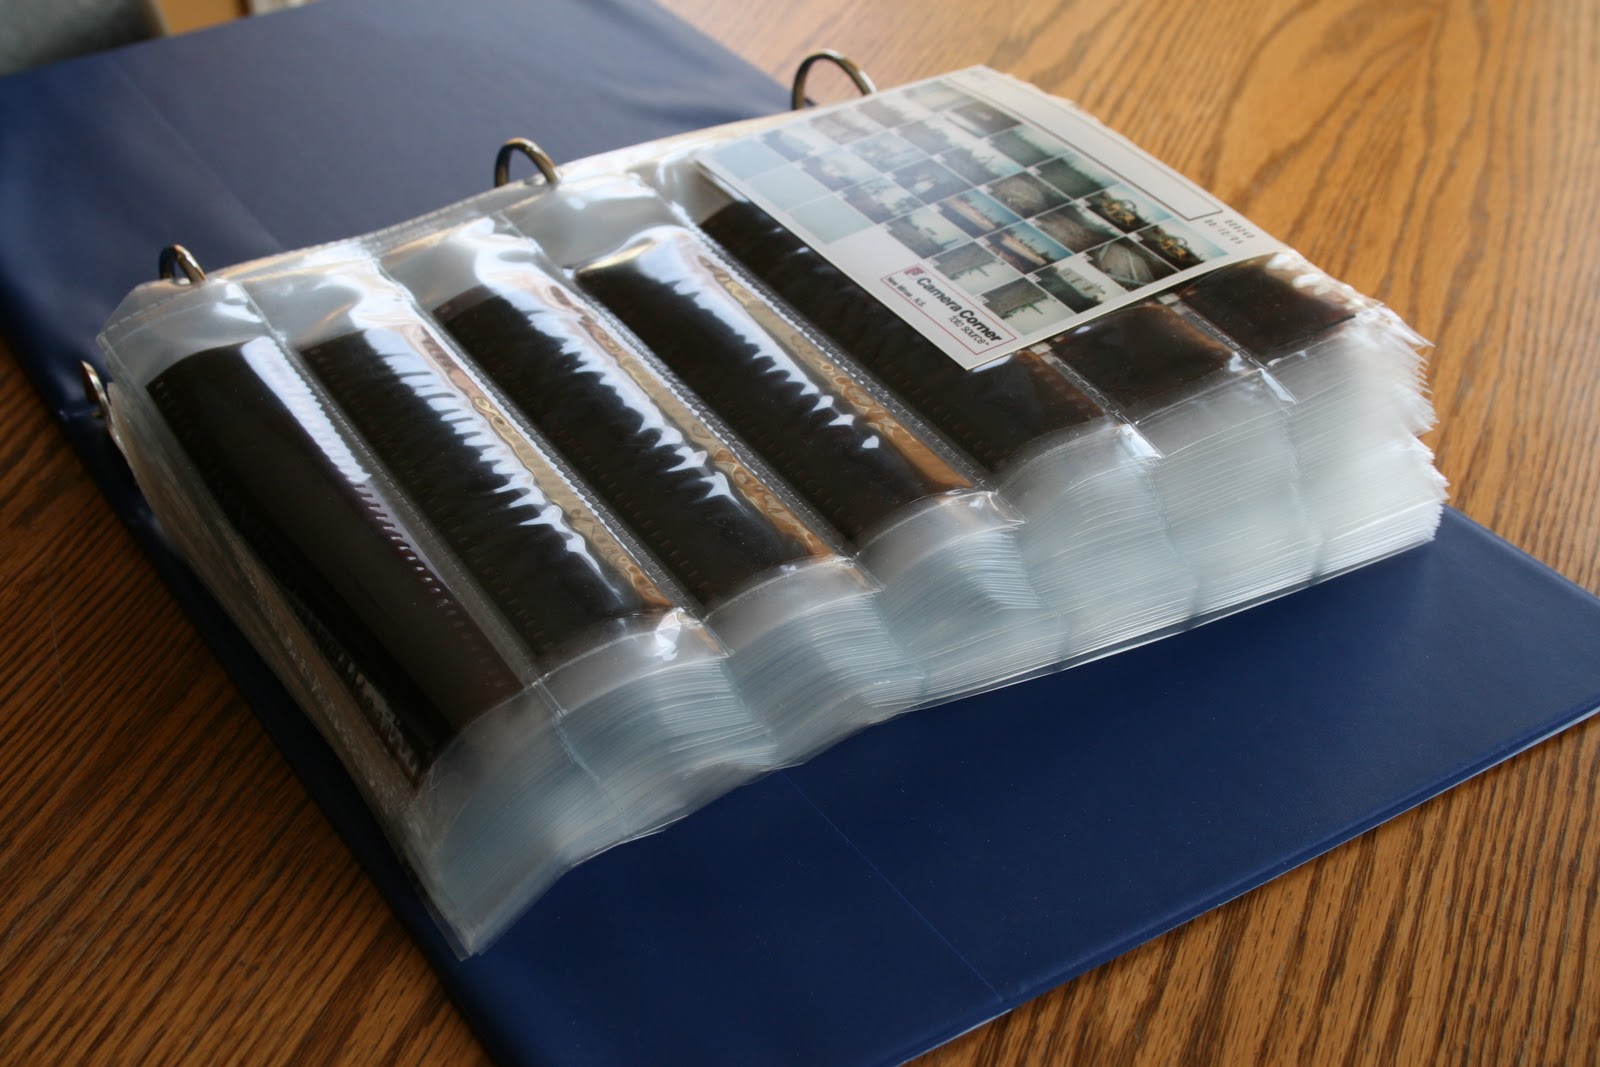
 I attached the contact sheet for each film on the appropriate protective sheet so I could quickly identify the negatives in the sleeves.
And I numbered each contact sheet/sleeve so that I would know the order of the sheets and where each belonged.
I used scrapbook adhesive to attach the contact sheets {the miniature sheet that shows whats on a roll of film}to the protective sleeves.
 This binder held 70 sheets, or negatives for 70 rolls of film.
 This method worked great for negative storage....and all my negatives arrived safely with me to our new home.

I started scrapbooking in 1999...... and organized photo storage is so important for pursuing that hobby because you can't scrapbook if you cannot find the photos you are looking for!
 This is the way I have been storing my photos for years now.
Lots of people use this method.... basic storage boxes.
The photos are stored by year and arranged in chronological order.
 I keep all the photos in their developing envelopes.
 However, I make sure to label all the envelopes with the date and what's inside.
I use simple white labels adhered to the envelopes and a pen.
This makes it easy to look for photos when scrapbooking too.


Easy Peasy.

For years and years people kept unorganized photos in old shoe boxes.
One of the big pushes behind the scrapbooking movement was encouraging people to get those photos organized and stored properly.
But then....enter the digital age.
Many, many households have switched to digital photography, but I think that many of us have exchanged those old shoe boxes for j.peg files that are not stored or backed up properly.
I know I am one of those!

I came across this article in the February 2010 issue of Real Simple Magazine and I saved it because it was so inspirational. It shows how one mom, Michele Bender, has all of her digital photos organized and labelled on discs.
This picture is just perfection...don't you agree?

So now....one of my goals for 2011 is to get my digital pictures off my computer and organized into a storage system like this!
I have pictures from 2006 onward to tackle.
I know that it will take some time and effort.
And I also want to get into the habit of printing pictures monthly.
 I am determined.


This post is linked to:


Visit thecsiproject.com


Organizing Junkie


Organize and Decorate Everything

Wednesday, January 26, 2011

How I Organized My Greeting Cards....

So today I scheduled in a little time to tackle this project that I have been wanting to do forever.
Not really forever. But at least since I re-organized my office space.
I had greetings cards 'thrown' into an Ikea storage box.
Every time I wanted a card, I had to rifle through the whole box to find what I was looking for.
No more.
 I took some bright pink cardstock and my index tab punch.
I love that index tab punch.
{I chose bright pink cardstock because it's easy to see and doesn't blend in with the cards.}
I cut the cardstock with the paper trimmer to make 'dividers' to fit the box and punched tabs from white cardstock for each divider. I stapled the tabs to each divider.
Then I sorted the cards into piles and wrote on each tab the contents.
Then I filed each card pile into the appropriate spot.
 Now I have this:

 This project cost nothing since I used things I already had...a paper trimmer, cardstock and index punch.
{You don't really need an index tab punch....you could just use small squares of cardstock.}

And here's one hint:
I buy most of my cards at the dollar store and the size fits nicely into this box.
If you buy more expensive cards...they are usually bigger and won't fit into this system as nicely. They may even be too big to fit into the box this way. So if you have bigger cards, you may want to buy a bigger box.


This post is linked to:


Visit thecsiproject.com


Organizing Junkie


UndertheTableandDreaming


Organize and Decorate Everything


Weekup Wrap Up Party @ Tatertots & Jello.

HouseofHepworths

lil luna link party button

giveaways

Tuesday, January 25, 2011

So Last Week Some Happy Things Happened To Me....

Maria Killam at Colour Me Happy Blog wrote a post entitled "10 Interesting Posts" and featured my post,
"The Secret of Great Entryways".
If you have never visited Maria's blog...you might want to go visit. She is a Vancouver-based interior designer who does fabulous work and her blog is so full of inspiring ideas and information.
 You can view the post here.

And my little office nook was chosen as 1 of 10 projects that won the 'organization challenge' at the CSI Project Blog.


I am go very grateful to Maria at Colour Me Happy and the girls at the CSI Project for finding my projects worthy!


Monday, January 24, 2011

Easy Crockpot Taco Soup

This is one of our absolute favourite meals in the winter.
It's so good on a cold chilly day.
You can also make it in the slow cooker...or on the stove top in a dutch oven.
You can change the vegetables and beans to suit your family's taste.
It freezes well too.
It can be served with tortilla chips, pita bread, rolls or bread.
It makes a terrific meal for a crowd too....great after a winter skating party or tobogganing.
I served this to my book club...and everyone wanted the recipe.
It's great after Christmas...when everyone is all 'turkeyed' out. 
Taco Soup

16 oz. can chili beans ( I used can of baked beans instead.)
16 oz. kidney beans
16 oz. can black beans
8 oz. can tomato sauce (I use 19 oz. can)
15 oz. can diced stewed tomatoes ( I use 28 oz. can.)
16 oz. can whole corn
16 oz. creamed corn
pkg. taco seasoning ( I use 2-3 Tbsps. of taco seasoning from a large container from Costco.)
1 Tbsp. chili powder
1 lb. ground beef (I have also used ground pork.), fully cooked. OR 1 bag of BIG BATCH BEEF.
1 onion, chopped, 1 green pepper, chopped & 1 red pepper, chopped
1 sm. can chopped green chilies

Directions:
1. Do not drain any of the canned foods. Add all ingredients to a crock pot and add taco seasoning to the soup.
2. Brown the ground beef in a pan with the chopped onion and add this combination to the crock pot OR add 1 bag of frozen BIG BATCH BEEF to crock pot.
3. Simmer for at least 4-5 hours. Serve warm and garnish with optional toppings: shredded cheese, sour cream, tortilla strips (cooked in frying pan with olive oil and grated parmesan cheese).
4. To make on stove top...cook meat with veggies OR start with one bag of BIG BATCH BEEF, taco seasoning and chili powder in large dutch oven. Then add all other ingredients and let simmer for about 30 minutes.

Bon Appetit!

Sunday, January 23, 2011

Blogger please behave....

So I made a few little changes to my header above.

Now it won't load with nice clear pictures.

Why.Oh. Why.

This is what it's supposed to look like.

Drats!

When I wake up tomorrow morning....can it please be magically fixed on it's own?


Friday, January 21, 2011

And moving on to 'Happy {Hearts} Day'...

So I skipped over decorating my mantel...or anything.... for Winter.
I have enough winter outside my front door thank you.
And this technically is not a mantel. It's the top of a piano.
A 'piano-tel' if you will.
I had all of these things already...except for the Valentine jelly bean mix, which I picked up this morning.
 The picture of Ron and I is from our first month of dating almost 20 years ago.
And the other picture is the fruit of our 20 years together...our 2 little sweeties.
 The absolutely gorgeous Valentine-themed subway art came from Eighteen 25.
{I love those girls at Eighteen 25. They share some pretty cool stuff. For free.}
Now if only someone were around to smack my hand away from those jelly beans.
I am so cursed with a 'sweet tooth'.


This post is linked to:


HouseofHepworths


giveaways


monogram

lil luna link party button
Visit thecsiproject.com


UndertheTableandDreaming 


Funky Junk's Saturday Nite Special
 
and
 
Weekend Wrapup Party at Tatertotos and Jello.
i'am author of old country buffet coupons
that give mcdonalds coupons
breakfast coupons you also can find recipe from 
banana nut bread paula deen
almond roca | sometimes you may needbeef bourguignon